How to Plan a TPLO: Step-by-Step Preoperative Planning
Quick answer
To plan a TPLO, take a calibrated true lateral radiograph of the tibia, place four landmarks to measure the tibial plateau angle, choose a saw blade radius and position the curved osteotomy, calculate the rotation needed to reach about 5°, template a plate, and record the measurements you will use in surgery.
Key takeaways
- Planning has seven steps: radiograph, calibration, landmarks and TPA, blade and osteotomy, rotation, plate, and export.
- Every millimeter depends on calibration, so calibrate against a marker at the level of the bone before measuring anything.
- Simulating the rotation on the image shows the resulting plateau angle directly, instead of relying on a chart.
- By hand this takes around 30 minutes per case; with osAlign's AI-assisted tools it takes under 60 seconds, with lengths reported to 0.1 mm.
Before you start: what a plan needs to answer
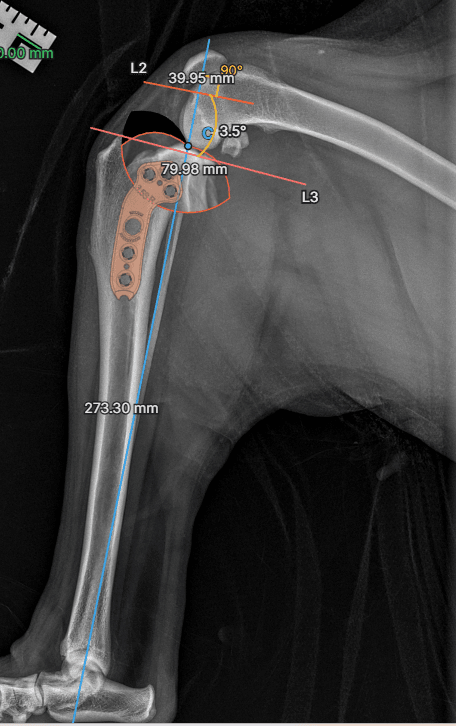
A TPLO plan answers five questions before you scrub in: What is the tibial plateau angle? Which saw blade fits this tibia? Where exactly does the cut go? How far do I rotate the plateau segment? Which plate fits? The steps below answer them in order. If you are new to the procedure, start with what TPLO surgery is and why it works.
Step 1: Get a planning-quality radiograph
You need a true mediolateral view of the entire tibia, from the stifle to the tarsus, with the stifle and hock each flexed to about 90°. The femoral condyles should superimpose and the center of the talus must be visible, because it defines the distal end of the tibial functional axis. Place a calibration marker at the level of the tibia.
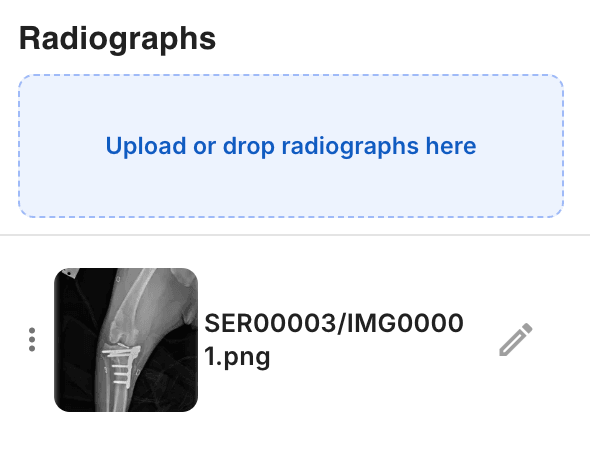
In osAlign, drag and drop the image or import the DICOM file straight into the case.
Step 2: Calibrate the image
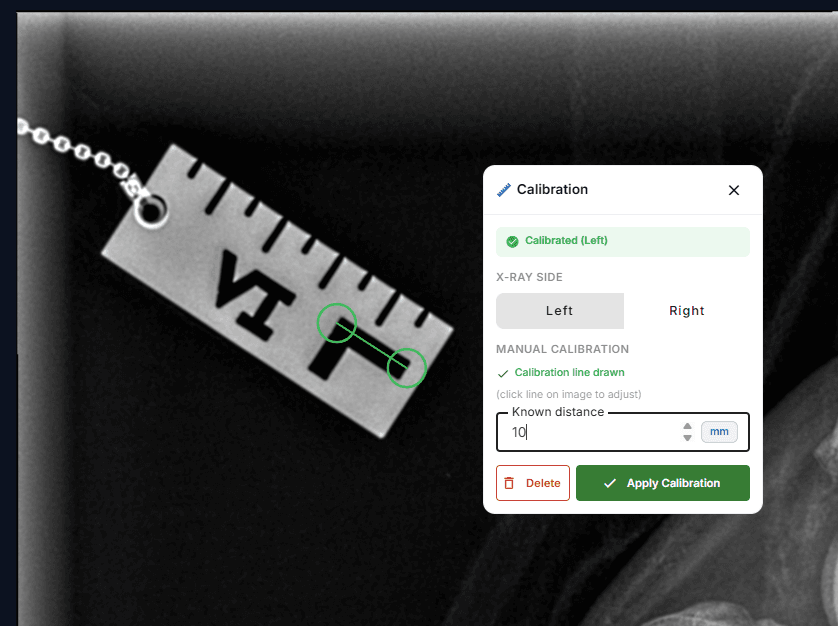
Draw a line across a known distance on the calibration marker and enter its length. From then on every measurement is in real millimeters. DICOM pixel spacing is a useful cross-check, but it describes the detector, not the bone, so magnification can make it misleading. The calibration guide explains why.
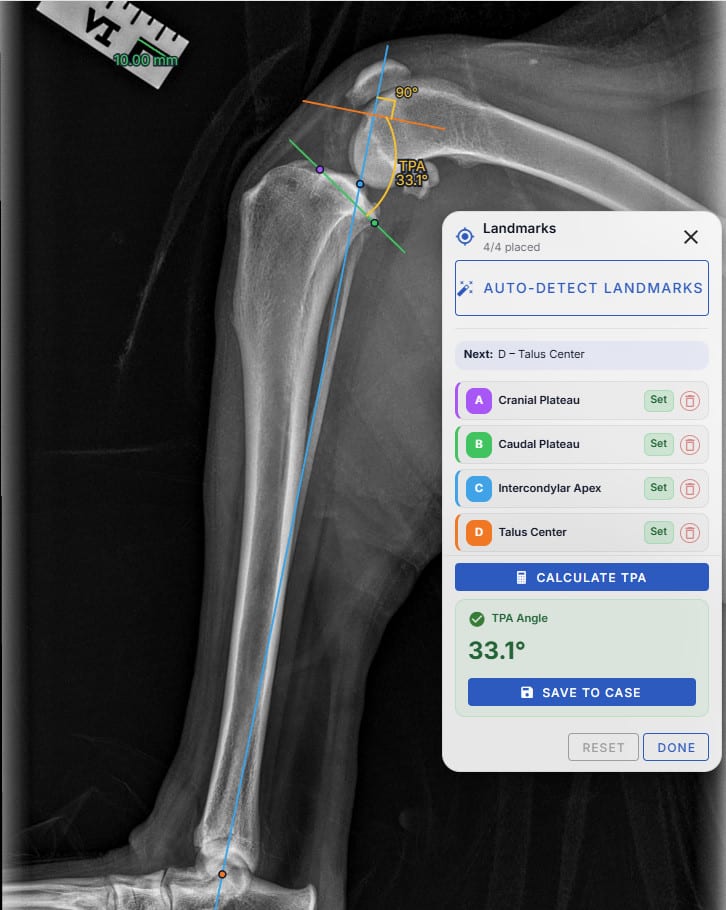
Step 3: Place four landmarks and measure the TPA
- A: Cranial plateau. The most cranial point of the medial tibial plateau.
- B: Caudal plateau. The most caudal point of the medial tibial plateau.
- C: Intercondylar apex. The midpoint between the intercondylar eminences, the proximal end of the functional axis.
- D: Talus center. The center of the talus, the distal end of the functional axis.
The functional axis runs from C to D. The TPA is the angle between the plateau line (A to B) and a line perpendicular to the functional axis. osAlign's AI can place all four landmarks for you to check and adjust, and it calculates the TPA the moment the fourth point is set. The TPA guide covers the measurement in depth.
Step 4: Choose the saw blade and position the osteotomy
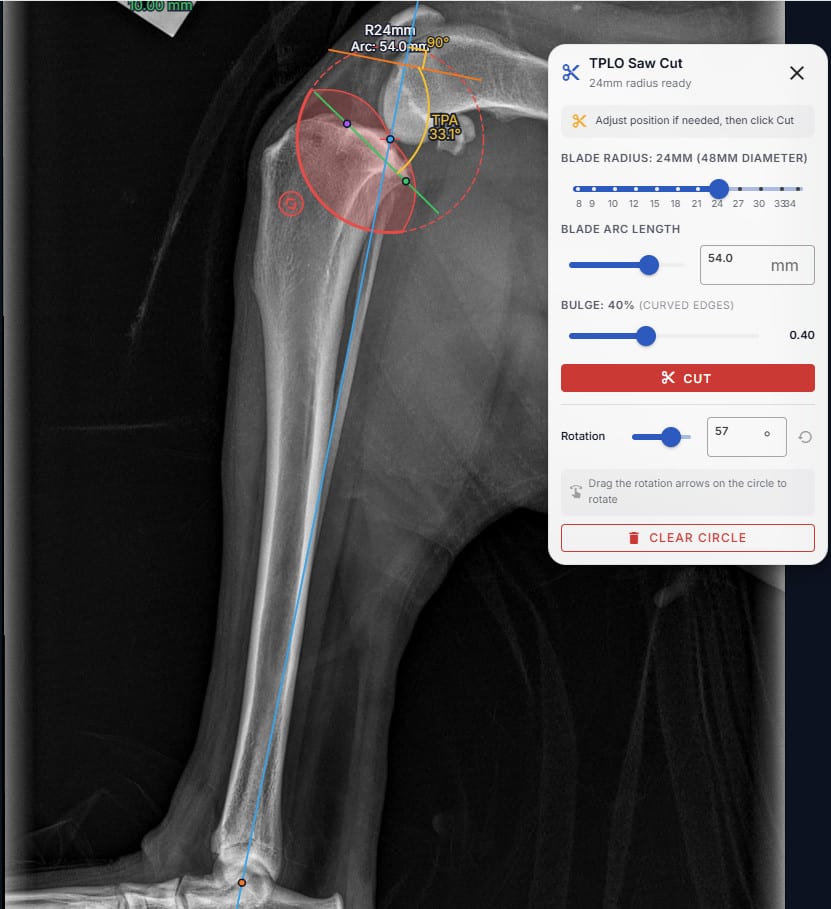
Pick a blade radius whose arc fits the proximal tibia, then position the circle. Most surgeons center the cut near the intercondylar eminence (in vitro work by Kowaleski and colleagues found a centered osteotomy minimized residual cranial tibial subluxation), while leaving enough tibial tuberosity cranial to the cut to reduce fracture risk.
In osAlign, the saw cut tool draws the blade circle at true size. You choose the radius from standard blade sizes, set the arc length, and adjust the curved edge, then drag the circle into place.
Step 5: Plan the rotation
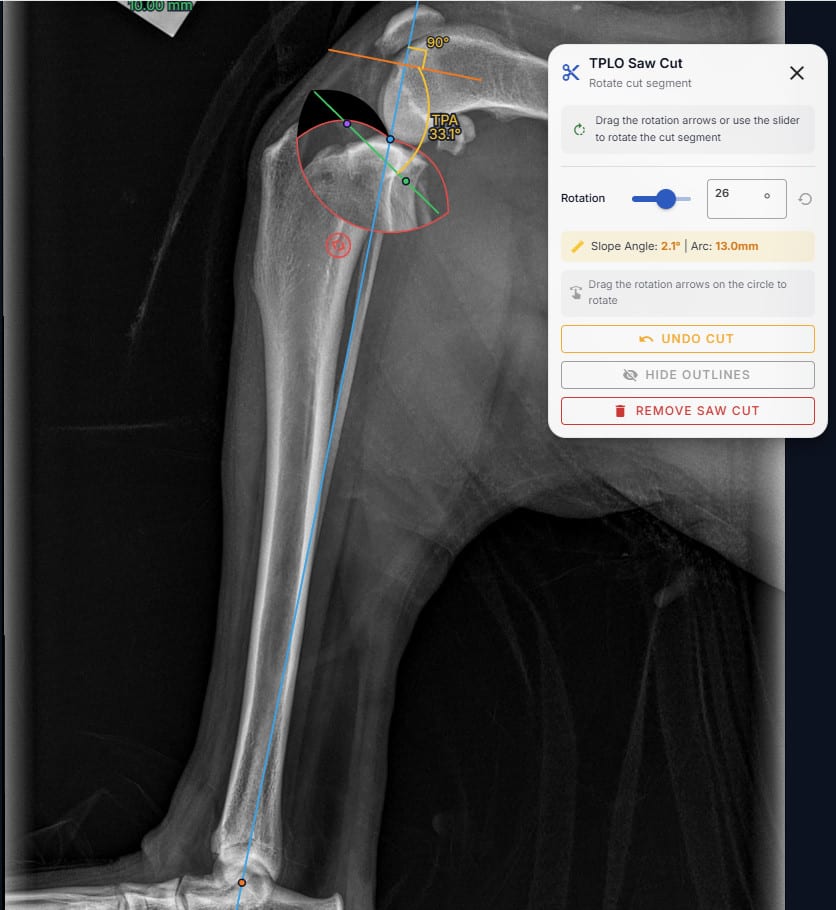
Decide your target post-op angle (commonly 5°) and rotate the plateau segment to it. The classic calculation converts the correction angle into a distance along the osteotomy for your blade radius:
Rotation distance (mm) = 2π × blade radius (mm) × (TPA − target angle) ÷ 360
Example: TPA 25°, target 5°, 18 mm blade → 2π × 18 × 20 ÷ 360 ≈ 6.3 mm.
osAlign goes a step further: cut the segment on the image and rotate it, and the panel reports the resulting slope angle and the arc length in millimeters as you go. You see the leveled plateau, not just a number from a chart. The rotation and blade guide explains the math and its limits.
Step 6: Template the plate
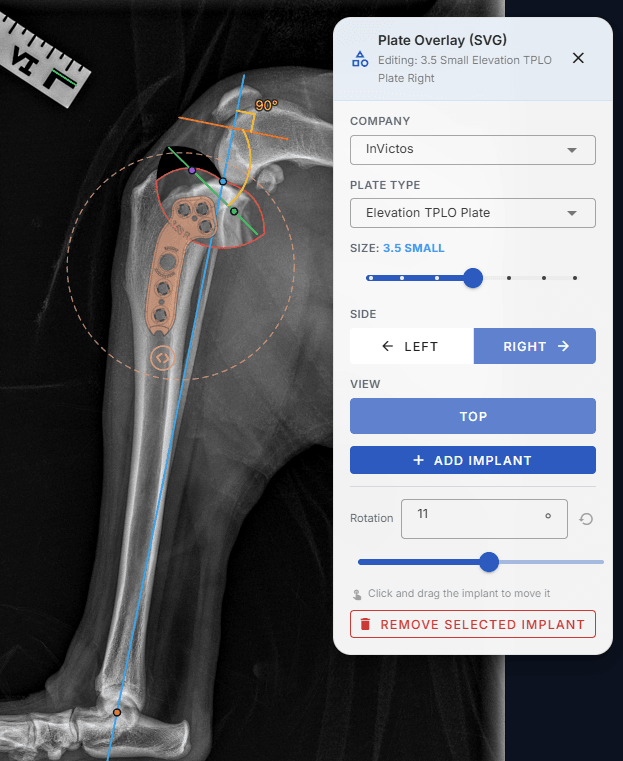
Overlay a plate at true size to confirm that the proximal screws sit in the plateau segment without entering the joint or crossing the osteotomy, and that the plate matches the shaft. osAlign's catalog uses plate outlines built from measured physical plates; choose the manufacturer, plate type, size, and side, then drag and rotate it into position. See choosing and templating a TPLO plate.
Step 7: Record and export the plan
Write down, or export, what you will use in the operating room: pre-op TPA, target angle, blade radius, osteotomy position measurements, rotation distance, and plate size. osAlign exports the annotated plan as a PDF and keeps the case in the cloud so the team can open it.
How long does TPLO planning take?
| Method | Typical time | What limits it |
|---|---|---|
| Printed film, acetates, and rotation charts | Around 30 minutes | Manual tracing, scaling, and chart lookup |
| Manual digital planning software | Several minutes to 30 minutes | Clicking every landmark and line yourself |
| osAlign with AI-assisted tools | Under 60 seconds | Reviewing and confirming what the AI placed |
Planning is not just paperwork. In a retrospective study of 468 TPLOs, Collins and colleagues found that osteotomies planned before and during surgery were closer to the centered position than free-hand cuts, and the planned group had no tibial tuberosity fractures in 172 surgeries versus 20 in 296 free-hand surgeries (6.8%).
Speed only matters if the plan is right, which is why the surgeon confirms every AI-placed landmark. For how exact the numbers are, see planning a TPLO to 0.1 mm precision.
TPLO planning checklist
- True lateral view, whole tibia, talus visible, condyles superimposed
- Calibration marker at bone level; calibration applied
- Four landmarks confirmed; TPA recorded
- Blade radius chosen; osteotomy centered and tuberosity width checked
- Target angle set; rotation distance recorded
- Plate size and position templated; no screws in the joint or the osteotomy
- Plan exported and shared with the surgical team
Frequently asked questions
What measurements do you need to plan a TPLO?
The tibial plateau angle, the saw blade radius, the osteotomy position, the rotation distance to reach your target angle (usually about 5°), and the plate size, all measured on a calibrated radiograph.
How long does TPLO planning take?
Manual planning typically takes around 30 minutes per case. With osAlign's AI-assisted tools, you can plan a case in under 60 seconds, including reviewing the AI-placed landmarks.
What radiograph view is used for TPLO planning?
A true mediolateral view of the whole tibia with the stifle and tarsus flexed to about 90°, the femoral condyles superimposed, the talus visible, and a calibration marker at the level of the bone.
Can software plan a TPLO automatically?
Today osAlign's AI places the tibial landmarks for you to confirm and calculates the TPA automatically. AI features that complete the whole preplan are rolling out across Q4 2026 into 2027, with the surgeon always reviewing the result.
References
- Collins JE, Degner DA, Hauptman JG, DeCamp CE. Benefits of pre- and intraoperative planning for tibial plateau leveling osteotomy. Vet Surg. 2014;43(2):142-149. https://pubmed.ncbi.nlm.nih.gov/24491234/
- Kim SE, Pozzi A, Kowaleski MP, Lewis DD. Tibial osteotomies for cranial cruciate ligament insufficiency in dogs. Vet Surg. 2008;37(2):111-125. https://pubmed.ncbi.nlm.nih.gov/18251804/
- Reif U, Dejardin LM, Probst CW, DeCamp CE, Flo GL, Johnson AL. Influence of limb positioning and measurement method on the magnitude of the tibial plateau angle. Vet Surg. 2004;33(4):368-375. https://pubmed.ncbi.nlm.nih.gov/15230840/
- Slocum B, Slocum TD. Tibial plateau leveling osteotomy for repair of cranial cruciate ligament rupture in the canine. Vet Clin North Am Small Anim Pract. 1993;23(4):777-795. https://pubmed.ncbi.nlm.nih.gov/8337790/
- Kowaleski MP, Apelt D, Mattoon JS, Litsky AS. The effect of tibial plateau leveling osteotomy position on cranial tibial subluxation: an in vitro study. Vet Surg. 2005;34(4):332-336. https://pubmed.ncbi.nlm.nih.gov/16212587/
- Fox DB. TPLO principles, patient selection, and preoperative planning (rotation distance formula).
- Assessment of the accuracy of digital surgical planning and its implementation with TPLO. Veterinary Research Communications (Springer), 2026. https://link.springer.com/article/10.1007/s11259-026-11253-w
For educational and planning support only. Surgeon judgment governs all clinical decisions.
Related guides
Plan your next TPLO in under 60 seconds
AI places the landmarks, the TPA is calculated instantly, and every measurement is reported to 0.1 mm. 30-day free trial with up to 5 cases, no credit card required.
Start free trial